
Video Recording |
The current shown Live Preview can be recorded as video.
Especially the picture capture settings are important and most used by users of the application. The best settings for good performance for a specific user application are often a resolution / quality versus frame rate issue. Higher resolution / no compression means lower frame rate due to the higher amount of data which has to be transferred over the connection link which has a limited bandwidth of appr. 480 Mbps (USB 2.0) or appr. 100 Mbps (Ethernet / LAN). Compressed picture transfer with the native Visualizer resolution normally provides the best results for most applications.
To add audio an installed sound device will be necessary (i.e. microphone) and needs to be activated in the "Preferences..." dialog.
Click onto the item of interest to open the corresponding subject:
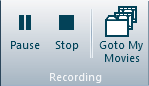
To start a the video recording process, simply start "Live Preview" by double clicking onto the symbol of the desired Visualizer in the Main Window and press the "Start" button on the menu tab "Video".

As soon as the live preview and video recording is started, the respective Visualizer is marked with a camera and a recording icon in the main window.
![]()
![]()
The application will now start to add every captured picture to a temporary movie file until you stop the recording, stop Live Preview or your hard disk gets full.
To stop the recording, just press the "Stop" button on the menu tab "Video".

A "Save Movie" dialog box will now ask you for the file name and the location to store the recorded movie. All movies will be stored as AVI files (container format).

After stopping and saving the video file, a pop-up message will ask you if you want to watch the saved video:

To pause a movie recording, simply press the "Pause" button on the menu tab "Video".
To resume a paused movie recording, simply press the "Resume Movie Recording" button on the menu tab "Video".
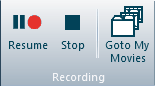
To open pre-defined destination directory in an explorer window, simply click on the "Goto My Movies" button on the ribbon tab.


Input the desired pre-defined path for saving movies into the address field. With the icon on the right end of the address field, you can browse your storage media.
The destination directories can also be changed in the "Preferences..." dialog.

The application vSolution Link by WolfVision can use nearly all codecs (compressors) installed on your computer. For example a standard Windows 7 installation comes with a few different codecs for the Windows Media Player (DV Video, MJPEG etc.). Most additional codecs added by other windows applications (for example video editing software / hardware) can be used as well. And different codecs can be found in the internet.
The video codec can be selected on the Video Ribbon Tab or in the "Preferences" dialog box (the audio codec can be selected in the named preferences dialog box only). The video resolution and detailed settings of the used codec can be adjusted in the codec properties settings (the availability of codec properties depends on selected codec).
Depending on selected codec and codec properties the resulting video file size and quality will vary.
As more different picture and audio content the application vSolution Link will have to process, as bigger the resulting file size.
Due to computer limitation, the frame rate will be decreased when using Annotation or Overlay Information together with Video Recording.
When adding Overlay Information or starting Annotation, a pop-up message will appear:

